Install Accela SDK and import it to your Android project so that you can develop applications for agencies or citizens with Accela SDK. There are two approaches to installing the Accela Android SDK:
■ Approach 1 - Installing Accela SDK via the Eclipse Plug-in
■ Approach 2 - Integrating Accela SDK into an Android Project Manually
This approach installs Accela SDK using an Eclipse plug-in, and creates a template project:
■ Task I: Installing Accela SDK
■ Task II: Creating Projects with Accela SDK
Using the Eclipse plug-in, you can install Accela SDK either online or offline.
■ To install Accela SDK online using an Eclipse plugin
■ To install Accela SDK offline using an Eclipse plugin
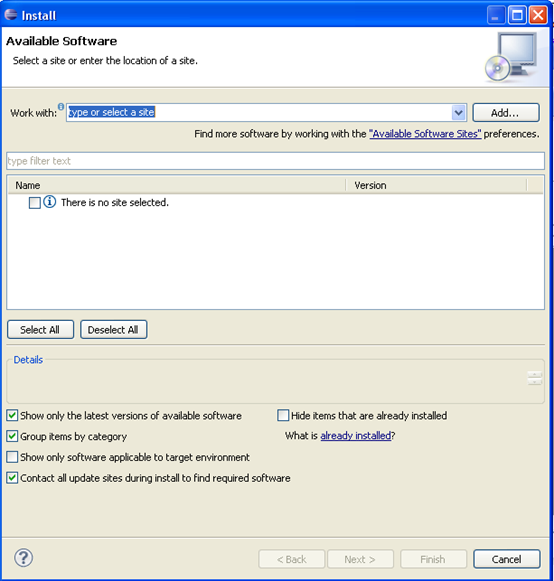
To install Accela SDK online using an Eclipse plugin
1. Start Eclipse.
2. Choose Help > Install New Software.
The Install window displays.
3. Click Add.
The Add Repository dialog displays.
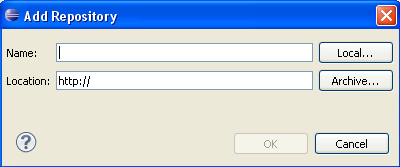
4. Enter the Accela SDK name.
5. Enter the location, https://developer.accela.com/sdk/android.
6. Click OK.
A list of available Accela SDK components displays.
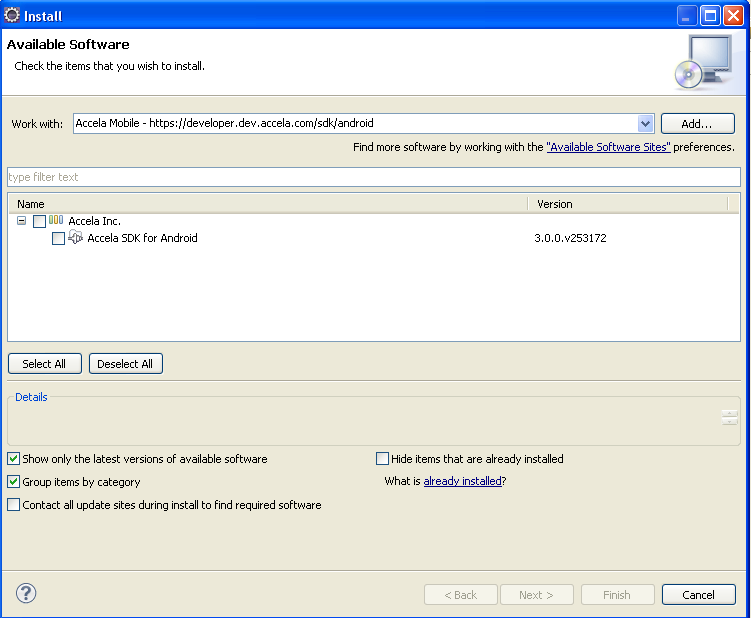
7. Select the Accela Inc. components.
8. Step through the wizard.
The Accela SDK plugin is now installed in Eclipse. You can continue with the steps to create a template project.
To install Accela SDK offline using an Eclipse plugin
1. Download the following Accela SDK offline installation package, then unzip it to a local folder.
2. Start Eclipse.
3. Choose Help > Install New Software.
4. Click Add.
5. Click Local....
The Browse For Folder window appears.
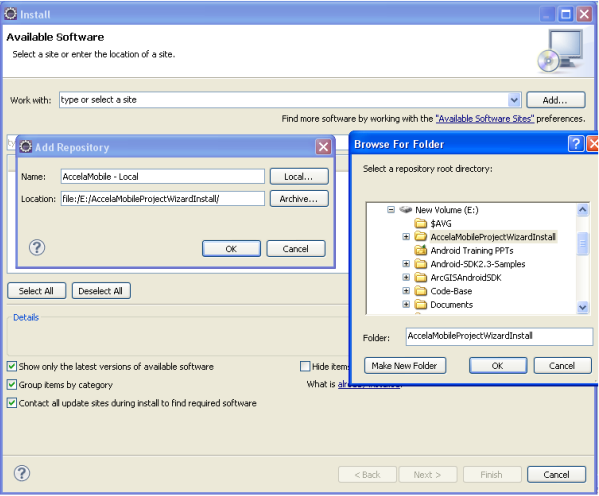
6. Browse and select the folder mentioned in step1 of this section. Enter the Accela SDK name, and click OK.
The list of available Accela SDK components appears.
7. Select the Accela Inc. components and step through the wizard.
To create a project with Accela SDK using an Eclipse plugin
1. Choose File > New > Project.
The New Project window displays.
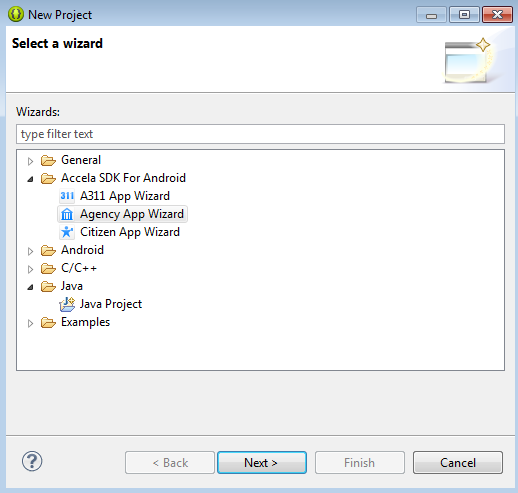
2. Select a project type corresponding to the type of app that you created in Registering Applications on the Accela Developer Portal.
3. Click Next.
The A311 or Agency or Citizen App Wizard window displays (depending on which project type you selected in the first step).

4. Fill in the fields. You need to use the App ID and App Secret that you created in Registering Applications on the Accela Developer Portal.
Note: The Android SDK Version means the Android API level on which the application runs so make sure the corresponding version of Android SDK is installed before selecting an API level. |
5. Click Next.
6. Enter the project name, choose a location, and then click Finish.
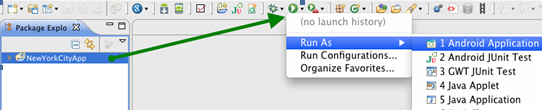
The Accela Agency App template project is created. The project name appears on the project tree panel. As it is a complete android project, you can run it directly.
Using this approach, you will manually integrate Accela SDK for Windows into an Android project:
■ Task I: Downloading Accela SDK for Android on Accela Developer portal
■ Task II: Creating Android Project Manually
■ Task III: Importing Accela SDK into Android Project Manually
To download Accela SDK for Android on Accela Developer portal
1. Use the following link to download the Accela SDK for Android. If you are not logged in the Accela Developer Portal, you will be prompted to login:
2. Save the downloaded zip file and extract the SDK file AccelaSDK.jar to a local folder.
To create an android project manually
1. Start Eclipse.
2. Choose File > New > Android Project.
The New Android Project dialog displays.
3. When prompted by the wizard, specify the following information:
Application Name |
Enter the Application name. |
Project Name |
Enter the project name. |
Package Name |
Enter the package name; for example, “com.accela”. |
Minimum SDK |
The minimum version number of Android SDK; for example, 10. This allows application to run on older versions, down to the specified Minimum SDK version. |
Target SDK |
The highest version number of Android SDK that the application works with; for example, 10. |
Create Activity |
To create activities, select Create Activity, then enter an activity name. |
Create a Test Project |
To create a test project select this option. In this example, clear the check box. |
4. Click Finish.
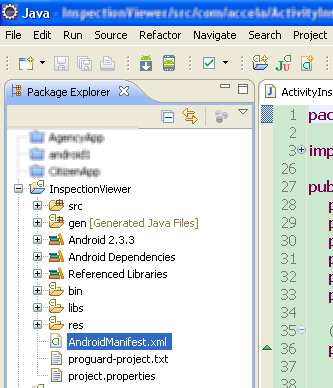
5. Update the Android Manifest XML file for Accela Mobile specific configurations.
a. Locate the AndroidManifest.xml file in the project navigation panel and open it.
b. Add the following content after the </application> element node:
<uses-permission android:name="android.permission.INTERNET" />
c. Add the declaration of AuthorizationActivity within the </application> element node; otherwise, you will be unable to invoke the authorization page, and unable to log in to the android application.
<activity android:name="com.accela.mobile.AuthorizationActivity" android:windowSoftInputMode="stateHidden" >
<intent-filter>
<action android:name="android.intent.action.VIEW"></action>
<category android:name="android.intent.category.DEFAULT"></category>
<category android:name="android.intent.category.BROWSABLE"></category>
<data android:scheme="amtest" android:host="authorize"></data>
</intent-filter>
</activity>
To import Accela SDK into Android project manually
1. Locate the home directory of your project; for example, D:\workspace\app\.
2. If the libs folder does not exist yet, create the libs folder.
3. Copy the AccelaSDK.jar file to the libs folder.
4. In Eclipse, press the F5 key on the keyboard to refresh the project tree view.
The Accela SDK is imported into the project.

5. Update the Android Manifest XML file for Accela Mobile specific configurations.
![]()